I have been journaling all summer...on paper. Yes, the old-fashioned way, with a pen. Weird, right?
Even weirder are the titles I give my entries. Here's a list:
So do it!
People Pleasing
God's In Control
Anti-Peer Pressure
Source of Salvation
Cheerfulness
Known by God
Fear & Trembling
Sabbath
Never Give Up, Never Surrender
Something From Nothing
Always Learning
Myths and Idols
Motives
Paul's Prayer for Me
Predicting the Future
God's Righteousness & Mercy
Zealous
A Great Nation
Life is a Poem
Dragon Hide (featured here in all its oddity)
Idol Time
The Battle Armor
Preach It!
The Gospel of Micah
Whose Plan?
Gloriously!
Trust & Obey
Will & Won't
Humility
Forget & Forgive
Looping
For This I Toil
So, there's a nice list of titles...just be glad you cannot read some of the thoughts attached. I am a messy mess of a mess much of the time. I contemplate time travel in conjunction with scripture. I have whole conversations with Paul, and I am pretty sure he answers. Actually, it's more of that time travel thing; I think he answered before I asked. Talk about predicting the future. Oh, and cupcakes. I spend a not-small time talking about cupcakes.
Just be thankful you only read the titles.
Friday, July 20, 2012
Sunday, July 8, 2012
Dragon Hide
I have been participating in summer women's fellowship with some of my dearest friends on Thursday nights. We read Divine Mentor by Wayne Cordeiro, and began reading the same passages of scripture, and then journaling according to his recommended method of note-taking and analysis.
We get together each week to discuss what the scripture has spoken into our hearts, and we are all blessed by each other. I know it continues to bless me abundantly every day, and Thursday night is rapidly becoming my favorite night of the week. If you are interested in attending, or just following along on the blog, the reading plan is listed here: http://summerwomensfellowship.blogspot.com .
In a spirit of transparency, here is a journal entry of mine from this week:
Scripture: Ephesians 4:17 Now this I say and testify in the Lord, that you must no longer walk as the Gentiles do, in the futility of their minds.
Observation: This week, Ephesians 4 calls for unity in the body of believers, reminding us that God equips us according to His purpose. We are called to grow up, to stop being children and to know God in a more mature way.
Growing up in Christ is not about education or works that we do in order to become like Him. It isn't the futility of our minds that we need, but a discipline of our hearts. We are called to put off our old, sinful ways, and to put on a new way, a way of holiness and righteousness.
Again, none of that "new way" is a work for us to do, but is God's very nature changing us from the inside out as partakers in the nature of God. Filled with His Spirit, the two natures are not compatible! As we allow God to work in our hearts, He will evict the sin nature that hangs on with claws, attached to our deepest desires. It is like Eustace in C. S. Lewis' The Voyage of the Dawn Treader, clawing at his dragon-self. We can scratch and claw, but until Aslan tears it away and washes us clean, we are still in our dragon hide.
Application: I am so very very guilty of a works-righteousness mentality. Goals and lists of what "to do" are supposed to fix my need for physical appearance, household things...all the "stuff" that draws my focus. If only I were thin, able to run a marathon, a gourmet chef, had a landscaped lawn, a zillion finished quilts, a decorated home, lovely furnishings...a perfectly planned school year, an organized classroom, ideal classroom management style...on and on goes my list of "if onlys" to make me content. BUT I WOULD NOT FIND CONTENTMENT THERE.
None of these desires are bad things, but by allowing them to draw my focus, I have made them into dragon hide I can only scratch. The true issue is that what I really want--freedom, glory, power, recognition, comfort, honor, praise, worship--is to be lord of my own life. To be Queen, and to take away the true Kingship and Authority that is Christ's. I battle for the throne, and in doing so, I am like a child playing dress-up, or throwing a temper-tantrum, trying to get my own way! Doesn't my heavenly Father know what is best for me? Doesn't He provide me with every good thing? What about the Gospel don't I believe?!?
Prayer: Lord, help me put off my old self, and renew me in the spirit of my mind, and put on my new self, created after the likeness of God in true righteousness and holiness. Change my desires to your desires. You love me, Amen.
Friday, July 6, 2012
Quilt Deconstructed
I finished a "Christmas in July" quilting project over the July 4th holiday, so I thought I'd post a blog about the process of using my quilting frame, and how I finish a quilt. This quilt top was pieced two or three years ago (probably in 2010, but it might have been 2009) from fabrics that I've had in my stash for years. It was a magazine pattern, so when I find that pattern, I'll probably remember when I pieced the top.
I went shopping last week in Jacksonville, NC, and found a perfect backing fabric to enable me to complete the project. I already had the polka dot for binding (and used it in my niece Megan's quilt, also recently completed).

The first step is to piece the backing fabric. My finished quilt is about 68" square, so I'll need four yards of backing fabric, with a few extra inches for safety. I actually finished a quilt once and ran out of backing fabric before I reached the end. It was so frustrating to have to take the quilt out of my frame, add a few more inches to the back, and then quilt the last bit. So, better safe than sorry!

Sizing is the best tool at this stage of the process! You want a perfectly smooth, wrinkle-free quilt back and top in order to have a nice finished product. Sizing is very different from starch. It actually sinks down into the fibers of the cloth, and restores them to their original shape. Here's a tip: sizing works really well to quickly remove wrinkles without ironing cotton pants. Spray lightly and smooth with your hands. Wrinkles will often just fall out.

My quilt frame takes up my entire sewing room, on the diagonal. I have to squeeze around the end to get behind it into the corner to quilt. When it's not in use, I push it against the wall, and am amazed by how big my sewing room actually is! The roller in the center of the picture is the first one I use. I attach the backing fabric to the strip of fabric in the roller with straight pins.

I just start at the left side, and then pin it straight along the seam of that roller fabric to fit it in the frame. When I first started using my frame (a Gracie II frame), it took me over an hour to put a quilt into the frame. This summer, I've gotten that time down to under half an hour.

My favored method of quilting involves this amazing device. What did we ever do before iPods? I actually like to listen to one of the Harry Potter books (this quilt was quilted while listening to HP & the Half Blood Prince) instead of music most of the time. Occasionally I set up the iPad and watch Netflix while I quilt, but it's never quite loud enough.

Once the quilt backing is pinned across the lead roller, then it's time to attach it to the top rear roller. Here I have it draped in a straight line to make sure it's going to be square in the frame.

I pin the backing fabric to the top rear roller, lining up the raw edges. Again, this helps make sure my backing is going to be square in the frame, and allows me to roll it up smoothly.

I roll the back onto the lead front roller, then check again for smoothness/straightness. Then I start rolling it the other way. Ultimately, I want the backing fabric rolled onto the rear top roller, with good firm tension, before adding the top to the lower rear roller.
I finish many more quilts now that I have my frame. Its separate tensioning means that I don't have to baste. The basting process was something I really hated, and it kept me from making further progress on my quilts. I would piece tops, and then just move on to another project. I could certainly have sent my quilts to a professional machine quilter (and did with the occasional quilt) but usually the quilt would just sit unfinished.

Now the back is ready for quilting. To prepare the top, I take it back to the ironing board for sizing (even if it's been ironed pretty well and hasn't been folded long, it always needs a last-minute pressing before it goes in the frame), and then pin the top's bottom edge along a drawn line on the fabric in the roller. Again, my purpose here is to make sure it's going in the frame nice and square, and that there will be no surprises in my finished piece.

Once it is pinned well, I wind the bottom roller to leave a smooth top an inch or two from the leading roller. Now it's time for the batting. For the first time ever, I decided to piece a batt to put in this quilt. I reasoned that it's a Christmas quilt, so it will probably go on a wall, and even then, only for a month or so each year. It certainly won't ever be heavily washed or dried. And, lately I've finished several quilts with a bamboo/cotton batt that is extraordinarily expensive (around $50 for a queen-sized batt), and always have a large piece leftover.
I used this "Heat Press Batting Together" material, available at all the local quilt shops for about $8. I only used two long pieces, and easily have enough to do another quilt, so for $4, I reclaimed a bamboo batt from scraps.

While I'm on the subject, let me give you my criticisms of this product. First, it was very difficult for me to get the right temperature on my iron to make the glue adhere to my batting. The bamboo batt is a nice dense batt, smooth and flat, and it should be the perfect choice for fusing. But either my iron wasn't hot enough to activate the glue, or I took their instructions of a "wool" setting too literally. Either way, I also wasn't clear if I needed to fuse this tape on one side or both sides of the seam. I ended up only fusing on one side, and then fusing a short piece on the ends to double-anchor there. Finally, it still left small gaps in the batt, and because I wasn't confident of the seam holding, I lined my seams up vertically instead of horizontally in the quilt (so gravity wouldn't pull them apart before I could quilt that far. This meant that I couldn't pull the batt on the sides to stretch it tight while quilting, and ended up quilting some lumps into my batting. But for $4 and reused materials, I decided I couldn't complain.

As the quilting progressed, I roll the leading roller, that goes under the machine, and scoot down the surface of the quilt 4" at a time or so. I quilt from both left to right and right to left. I made a hasty decision when I began quilting to use a cream-colored Sulky Blendables thread for the top (because I had enough already), and a nice off-white on the bobbin. I wound four bobbins to begin, and ended up using 10 bobbins in all. I made another hasty decision to outline quilt the poinsettia fabric with a technique I call "thread-painting," but randomly and without fear. That just means that I chose not to obsess if I missed a line or two, or if I didn't outline every little shape. However, it did mean once I started, I had to keep going...and going...and going. It added a lot of quilting time to the process.


As I finish off the quilt, the batting starts to run out (hopefully not before the quilt does!), and I can see the lower border showing up on the bottom roller. I have to pause frequently as I quilt. Sometimes I can go from one side to the other in a nonstop pass, but typically I go about 10-15" and then stop for a breath and a rest of my poor arthritic hands. What you don't see in these still photos is that I have to squeeze that handle on the left side of my machine with my right hand (I am decidedly right-handed), and then stoop over the machine like an old woman to see where the needle is sewing. There is NOTHING ergonomic about this process. It is exhausting. And now that I'm having some Plantar Fasciitis issues in my right foot, it can be downright painful.

I end up with a pretty deep bruise in the palm of my hand, mostly from my own bad habit of holding the handle too hard. Keep in mind I'm squeezing the handle to push the foot pedal (so it determines the speed of the needle) and I'm also using the handle to move the machine over the surface of the quilt. Not bad for someone who can't walk and chew gum! Quilting is my sport...and I'm semi-pro!
I'm going to skip a few photos here at the end, because it occurs to me that this is the longest blog post ever...but I do want you to see how to finish up. When the quilt is complete (at the end, I have to pin the trailing edge of the top to the batting/backing and quilt right up to the edge, just like I started in the beginning), I have to remove the front roller with the rolled up quilt on it and take it somewhere where I can unroll it, and trim the excess backing and batting away. Usually I walk down the hallway to the Media Room, and use the open carpet space there.

It's always a fun surprise to unroll it, and get the finished effect of quilting on the surface of the quilt. No matter how many of these I do, I'm always convinced that this one will be "ruined"...it will be stiff, or the quilting will turn out wrong, or lumpy. I've not been disappointed yet. I am really careful as I put the piece in the frame, I work carefully as I quilt, and it always looks just fine. But still I fret every time!

Now I have to trim the quilt down to attach the binding. For most quilts I have made lately, I have already pieced and prepared the binding so that I can sew it on immediately. This quilt finished faster than I expected, so I had to go downstairs and make binding before I could sew it on. I just use scissors to trim the extra fabric away, leaving a scant eighth inch of batting/backing showing beyond the top to "fill" the binding. I have made 2 1/4" and 2 1/2" double folded bindings lately, and I think I prefer 2 1/2" on a lap-sized quilt or larger (like this one is).

I completely forgot to take any pictures of the binding process! Oh, well, perhaps for another blog.
Here is the finished project! Christmas in July was a fun quilt to sleep under last night. It was much more snuggly than I thought it would be with all that thread in it. It drapes well, and the shirting fabric on the back is soft and warm. The quilt finished 65" square.


The first step is to piece the backing fabric. My finished quilt is about 68" square, so I'll need four yards of backing fabric, with a few extra inches for safety. I actually finished a quilt once and ran out of backing fabric before I reached the end. It was so frustrating to have to take the quilt out of my frame, add a few more inches to the back, and then quilt the last bit. So, better safe than sorry!

Sizing is the best tool at this stage of the process! You want a perfectly smooth, wrinkle-free quilt back and top in order to have a nice finished product. Sizing is very different from starch. It actually sinks down into the fibers of the cloth, and restores them to their original shape. Here's a tip: sizing works really well to quickly remove wrinkles without ironing cotton pants. Spray lightly and smooth with your hands. Wrinkles will often just fall out.

My quilt frame takes up my entire sewing room, on the diagonal. I have to squeeze around the end to get behind it into the corner to quilt. When it's not in use, I push it against the wall, and am amazed by how big my sewing room actually is! The roller in the center of the picture is the first one I use. I attach the backing fabric to the strip of fabric in the roller with straight pins.

I just start at the left side, and then pin it straight along the seam of that roller fabric to fit it in the frame. When I first started using my frame (a Gracie II frame), it took me over an hour to put a quilt into the frame. This summer, I've gotten that time down to under half an hour.

My favored method of quilting involves this amazing device. What did we ever do before iPods? I actually like to listen to one of the Harry Potter books (this quilt was quilted while listening to HP & the Half Blood Prince) instead of music most of the time. Occasionally I set up the iPad and watch Netflix while I quilt, but it's never quite loud enough.

Once the quilt backing is pinned across the lead roller, then it's time to attach it to the top rear roller. Here I have it draped in a straight line to make sure it's going to be square in the frame.

I pin the backing fabric to the top rear roller, lining up the raw edges. Again, this helps make sure my backing is going to be square in the frame, and allows me to roll it up smoothly.

I roll the back onto the lead front roller, then check again for smoothness/straightness. Then I start rolling it the other way. Ultimately, I want the backing fabric rolled onto the rear top roller, with good firm tension, before adding the top to the lower rear roller.
I finish many more quilts now that I have my frame. Its separate tensioning means that I don't have to baste. The basting process was something I really hated, and it kept me from making further progress on my quilts. I would piece tops, and then just move on to another project. I could certainly have sent my quilts to a professional machine quilter (and did with the occasional quilt) but usually the quilt would just sit unfinished.

Now the back is ready for quilting. To prepare the top, I take it back to the ironing board for sizing (even if it's been ironed pretty well and hasn't been folded long, it always needs a last-minute pressing before it goes in the frame), and then pin the top's bottom edge along a drawn line on the fabric in the roller. Again, my purpose here is to make sure it's going in the frame nice and square, and that there will be no surprises in my finished piece.

Once it is pinned well, I wind the bottom roller to leave a smooth top an inch or two from the leading roller. Now it's time for the batting. For the first time ever, I decided to piece a batt to put in this quilt. I reasoned that it's a Christmas quilt, so it will probably go on a wall, and even then, only for a month or so each year. It certainly won't ever be heavily washed or dried. And, lately I've finished several quilts with a bamboo/cotton batt that is extraordinarily expensive (around $50 for a queen-sized batt), and always have a large piece leftover.
I used this "Heat Press Batting Together" material, available at all the local quilt shops for about $8. I only used two long pieces, and easily have enough to do another quilt, so for $4, I reclaimed a bamboo batt from scraps.

While I'm on the subject, let me give you my criticisms of this product. First, it was very difficult for me to get the right temperature on my iron to make the glue adhere to my batting. The bamboo batt is a nice dense batt, smooth and flat, and it should be the perfect choice for fusing. But either my iron wasn't hot enough to activate the glue, or I took their instructions of a "wool" setting too literally. Either way, I also wasn't clear if I needed to fuse this tape on one side or both sides of the seam. I ended up only fusing on one side, and then fusing a short piece on the ends to double-anchor there. Finally, it still left small gaps in the batt, and because I wasn't confident of the seam holding, I lined my seams up vertically instead of horizontally in the quilt (so gravity wouldn't pull them apart before I could quilt that far. This meant that I couldn't pull the batt on the sides to stretch it tight while quilting, and ended up quilting some lumps into my batting. But for $4 and reused materials, I decided I couldn't complain.

Finally, it is time to start quilting! The batting is lined up just below the roller between the top and back (it isn't rolled at all...it just drapes to the ground under the frame, and feeds up between the layers as I roll the quilt), and then the leading edge of the quilt is pinned so that I can take a first row of quilting stitches to anchor it in place. I remove those pins as soon as the quilt top was anchored.
As the quilting progressed, I roll the leading roller, that goes under the machine, and scoot down the surface of the quilt 4" at a time or so. I quilt from both left to right and right to left. I made a hasty decision when I began quilting to use a cream-colored Sulky Blendables thread for the top (because I had enough already), and a nice off-white on the bobbin. I wound four bobbins to begin, and ended up using 10 bobbins in all. I made another hasty decision to outline quilt the poinsettia fabric with a technique I call "thread-painting," but randomly and without fear. That just means that I chose not to obsess if I missed a line or two, or if I didn't outline every little shape. However, it did mean once I started, I had to keep going...and going...and going. It added a lot of quilting time to the process.


As I finish off the quilt, the batting starts to run out (hopefully not before the quilt does!), and I can see the lower border showing up on the bottom roller. I have to pause frequently as I quilt. Sometimes I can go from one side to the other in a nonstop pass, but typically I go about 10-15" and then stop for a breath and a rest of my poor arthritic hands. What you don't see in these still photos is that I have to squeeze that handle on the left side of my machine with my right hand (I am decidedly right-handed), and then stoop over the machine like an old woman to see where the needle is sewing. There is NOTHING ergonomic about this process. It is exhausting. And now that I'm having some Plantar Fasciitis issues in my right foot, it can be downright painful.
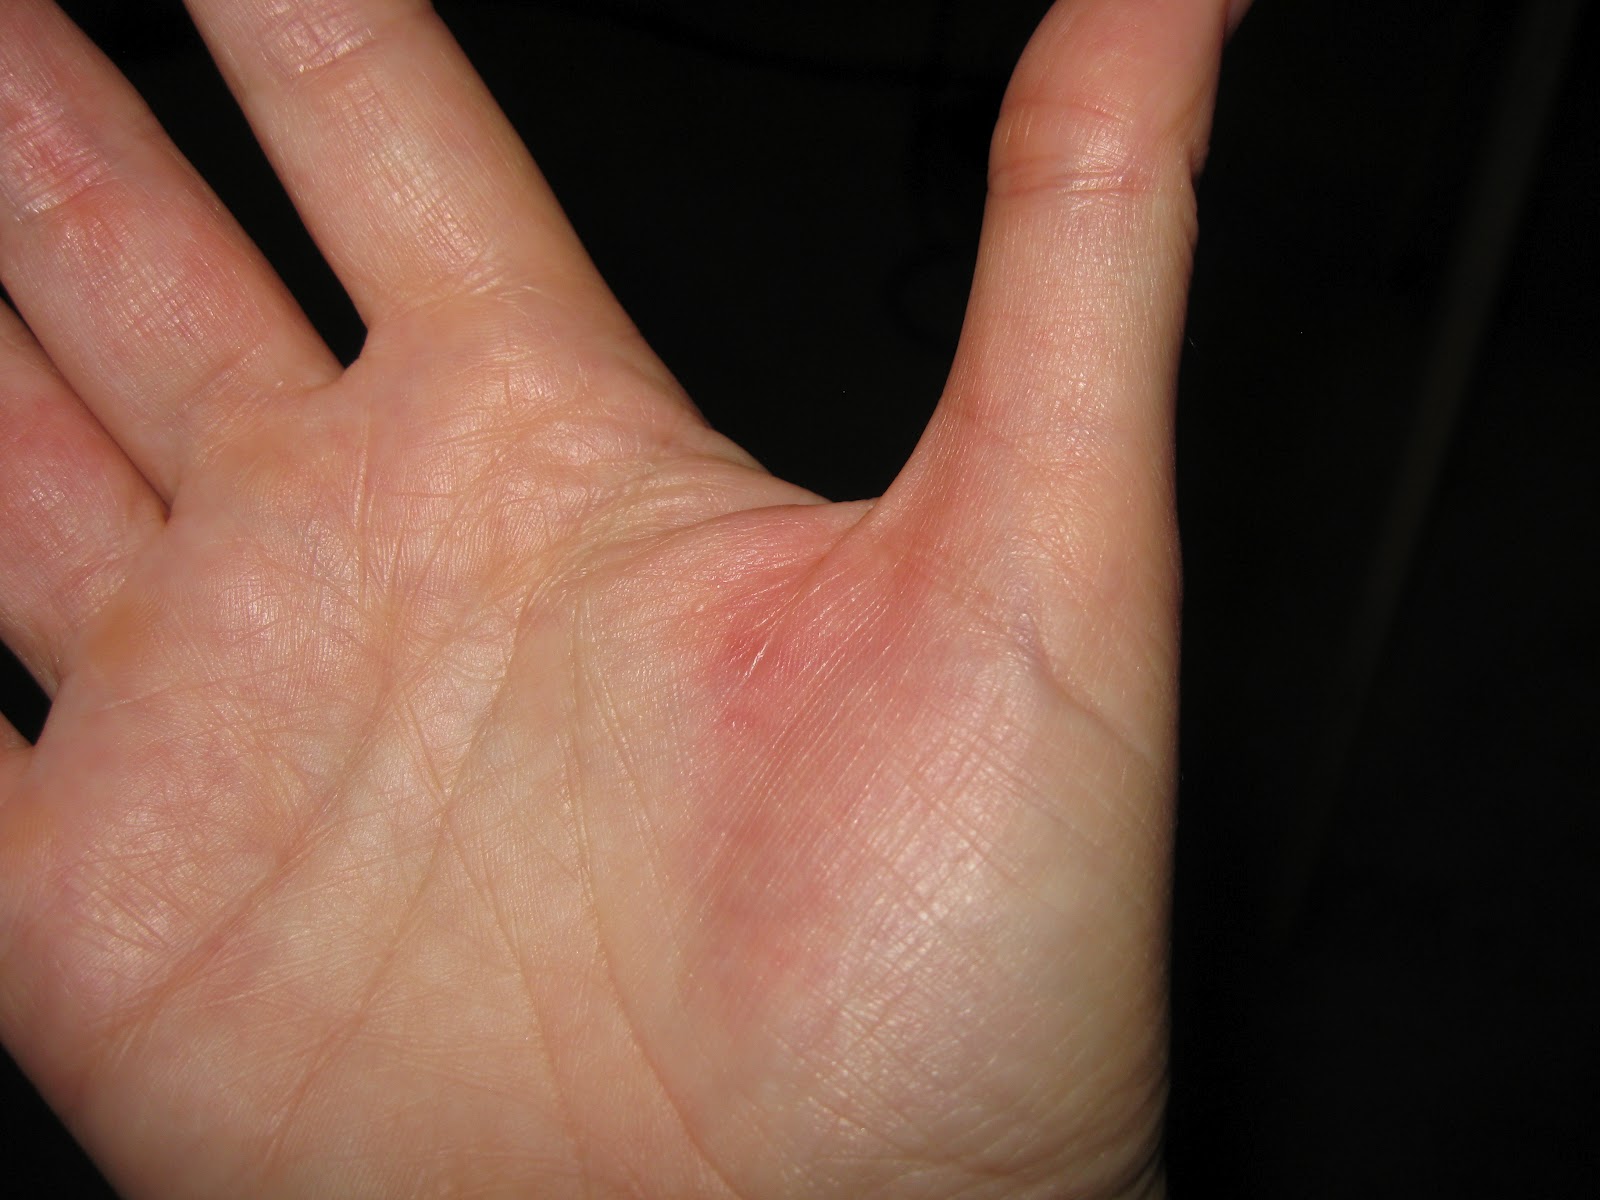
I end up with a pretty deep bruise in the palm of my hand, mostly from my own bad habit of holding the handle too hard. Keep in mind I'm squeezing the handle to push the foot pedal (so it determines the speed of the needle) and I'm also using the handle to move the machine over the surface of the quilt. Not bad for someone who can't walk and chew gum! Quilting is my sport...and I'm semi-pro!
I'm going to skip a few photos here at the end, because it occurs to me that this is the longest blog post ever...but I do want you to see how to finish up. When the quilt is complete (at the end, I have to pin the trailing edge of the top to the batting/backing and quilt right up to the edge, just like I started in the beginning), I have to remove the front roller with the rolled up quilt on it and take it somewhere where I can unroll it, and trim the excess backing and batting away. Usually I walk down the hallway to the Media Room, and use the open carpet space there.

It's always a fun surprise to unroll it, and get the finished effect of quilting on the surface of the quilt. No matter how many of these I do, I'm always convinced that this one will be "ruined"...it will be stiff, or the quilting will turn out wrong, or lumpy. I've not been disappointed yet. I am really careful as I put the piece in the frame, I work carefully as I quilt, and it always looks just fine. But still I fret every time!

Now I have to trim the quilt down to attach the binding. For most quilts I have made lately, I have already pieced and prepared the binding so that I can sew it on immediately. This quilt finished faster than I expected, so I had to go downstairs and make binding before I could sew it on. I just use scissors to trim the extra fabric away, leaving a scant eighth inch of batting/backing showing beyond the top to "fill" the binding. I have made 2 1/4" and 2 1/2" double folded bindings lately, and I think I prefer 2 1/2" on a lap-sized quilt or larger (like this one is).

I completely forgot to take any pictures of the binding process! Oh, well, perhaps for another blog.
Here is the finished project! Christmas in July was a fun quilt to sleep under last night. It was much more snuggly than I thought it would be with all that thread in it. It drapes well, and the shirting fabric on the back is soft and warm. The quilt finished 65" square.

Subscribe to:
Posts (Atom)